Table of Contents
Here I am going to share some useful Tips and Tricks in overhauling the vertical and horizontal shaft of a Mitsubishi Selfjector Purifier.
I am not going to discuss the safeties to be carried out in this article as I have already discussed them in detail with the complete overhaul of the Mitsubishi Purifier Bowl in my previous article.
You can read the bowl overhaul part by clicking here.
So I believe that you have read all the safety procedures of overhauling a purifier and taken out the bowl safely and now ready to go ahead to disassemble the horizontal and vertical shaft.
NOTE: always keep in mind that while disassembling, we have first to disassemble the horizontal shaft and then Vertical Shaft.
And while assembling back, we have first to place the Vertical shaft and then the Horizontal shaft.
Overhauling the horizontal shaft of Mitsubishi Selfjector Purifier
- Firstly remove the lube oil from the gear case through the drain plug.
- If your Purifier has attached gear pump then firstly drain the oil (inside of the piping) through drain plug and after that remove the piping from the gear pump, and finally remove the gear pump.
- Now support the purifier motor with the help of a chain block, remove the bolts and withdraw the motor.
- While removing the motor, take care of the friction pads.
NOTE: Sometimes the condition of friction pads is so pathetic that they are not recommended for reuse, and at the same time, if new spares are not available, we can scratch the surface of the old friction pads with a hack-saw blade in a zigzag pattern to make the Purifier operational.
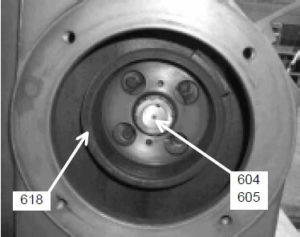
5. Now remove the lock nut and lock washer securing the friction pulley on the horizontal shaft. For this, you can use a big screwdriver and hammer.
6. To withdraw the friction pulley, we need to use the special tool shown in the figure.
7. Now to take out the horizontal shaft, you can ask someone for help.
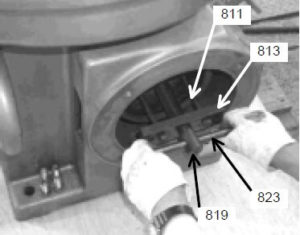
NOTE: You have to withdraw the horizontal shaft towards the pump side. Sometimes it will not come so easily, and you need to strike from the motor side with the help of some copper or Teflon rod.
Make sure to hold the horizontal shaft firmly to avoid any damage.
8. Now I recommend taking the photographs of the horizontal shaft in as many angles as you can, especially note down in your diary about the bearings (whether bearing number is on the top side or bottom side).
9. Now you can start pulling out the bearings using the special tool or bearing puller in case special tool is not available.
10. Keep all the removed parts in a separate tray to avoid the unnecessary loss of the spares.
Overhauling the Vertical Shaft of Mitsubishi Selfjector Purifier
- Measure the Vertical shaft height by following the procedure given in the manual and note it down in your diary.
- The next step is to remove the Water Supplying device, for that remove the Bush mounted in the upper portion of the vertical shaft using the special tool, remove the operating water tube from the water supply device.
- Don’t forget to remove the Allen keys screwed in the upper part of the water supplying device.
- Then loosen all 3 Allen bolts in the base of water supplying device and lift the device by jacking with the special tool.
- Now take out bearing cover along with bearing cap.
NOTE: Keep in mind that, this bearing cap has an O-ring inside it, so sometimes it becomes difficult to pull it out. Try to clear off the sludge from the bearing cover, use lube oil or WD-40 to ease up the process.
- Now safely take out the flat spring, spacer and bearing housing (1).
NOTE: Before removing the bearing housing (1), mark the top position of the bearing housing with a permanent or paint marker. And at the time of reassembly, place it in the same way as removed (i.e. marked surface on the top)
- Now, take out the vertical shaft carefully and don’t forget to take out the spring seat, steel ball, lower spring and washer (if present).
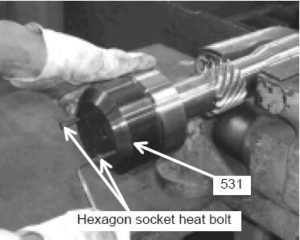
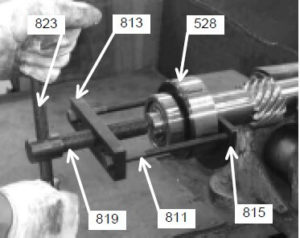
8. Now the tricky part in disassembling the vertical shaft is to remove the Bearing case. For that, thread two hexagonal socket head bolts equally in the bearing case, and it will come out easily.
9. Then take out all the bearings and spacers with the help of a special tool or a bearing puller in case the tool is not available.
Some useful Tips for a perfect reassembly
- Clean all the parts thoroughly with any cleaning oil.
- Since it is 8000 Hours routine, change all the O-rings, Steel ball, Lower spring (after measurement), gasket of water supply chamber, etc.
- Use Vaseline to lubricate the O-rings.
- Don’t reuse any of the removed bearing otherwise accident can happen.
- Fit all the bearings in the sequence of their removal.
- Heat all the bearings in an oil pan up to a temperature of 80 degrees or as specified in the respective manual before assembling.
- Keep a print out of the assembly drawings handy to avoid any mistakes.
- In case of any doubt, don’t hesitate to ask your senior engineers.
NOTE: As I said earlier while reassembling, we have first to put back the vertical shaft of the Purifier and then the horizontal shaft.
Assembling the Vertical Shaft of the Purifier
- Clean the bearing housing (2) thoroughly and make sure no oil or bearing metal is present at the time of assembly.
- Clean the Gear oil sump with rags.
- Place the washer, lower spring, and steel ball in the bearing housing before putting the vertical shaft assembly.
- Align the key on the bearing cover with the groove in the bearing housing while putting back the vertical shaft.
- Now assemble the entire vertical shaft in the reverse order of the disassembly.
Assembling the Horizontal shaft of the Purifier
- Insert the Horizontal shaft from the gear pump side and try to align the spiral gear with the teeth in the vertical shaft.
- Then the next step is to put back the Friction pulley. For that, apply lube oil on the motor side of the horizontal shaft and slide the friction pulley over the shaft and secure it with the lock washer and lock nut.
- Now follow the reverse order as of disassembly to assemble back the horizontal shaft.
With this, we have learned about the overhauling of Horizontal and vertical shaft of a Mitsubishi Selfjector Purifier.
I hope these tips will help you in avoiding some of the common mistakes that most of the engineers make.

2 thoughts on “Mitsubishi Purifier Overhaul 8000 Hours Routine”